Wondering about how to start a WordPress blog on Bluehost ? Here is the solution. Basically Bluehost is a type of hosting service which offers various options like domain hosting, shared hosting, email accounts and much more. It further allows you to install another service also with your present Bluehost domains.
It also offers 24/7 network, including toll free phone line services.
Nowadays, there are many cheap and reliable options easily available for hosting WordPress and one of them is Bluehost. This is one of the most commonly used hosting options of WordPress.
It comes with only shared hosting packages in which you can use multiple sites also. On the other hand, it is one of the top recommended hosts by WordPress and they also scale their server for giving optimum performance when you are using WordPress.
Further, it also offers unlimited storage capacity, bandwidth and premium support and also everything else which is needed to run a successful WordPress blog.
So, if you have planned starting a blog to Bluehost and you are interested in learning about how to start a blog using WordPress, then this article will definitely help you. WordPress is considered to be a world’s largest blogging platform and is a complete content management system to build different types of websites.
On the other hand, before you start building your WordPress blog it is very important for you to take the right hosting decision for it.
Basically choosing a web host is a very important decision as there are many hosting companies easily available today, but out of all Bluehost is the best and specially for WordPress.
Using a self hosted WordPress site gives you a complete control to manage your site in the way you want. The web host is the place where you are going to install your WordPress software and the server where your blog will be stored. The most important aspect is that even WordPress recommends Bluehost as the number one hosting service.
>>>>CLICK HERE TO LAUNCH SELF HOSTED WORDPRESS BLOG WITH BLUEHOST AT 3.49$ Per MONTH SPECIAL PRICE
Below are the various steps which explain each and every detail about how to start a WordPress blog on Bluehost:
1. Set up a domain name and hosting account

A proper domain name is very important as it will be a web address of your blog. It is also known as your URL or your address on the web. But before you start thinking about choosing your domain name, you will first have to set up hosting for your blog and for that Bluehost is the best choice. This is the place where your blog will live or you can say a place where you will rent a space to install your WordPress and build your blog.
There are thousands of hosting services available today but Bluehost is one of the best because of following reasons:
- One of the most important reasons for choosing Bluehost is that it has 24/7 support mail, chat or phone. Its support staff is very quick and knowledgeable.
- Secondly, it is also best in reliability and it boasts an uptime average of almost 99.99%.
- Another important aspect is that it is very easy to use and it has outstanding customer service support.
- It also offers unlimited storage space, bandwidth and domain names.
- It is easily affordable by everyone and comes with various types of packages out which you can easily select the one according to your needs.
- Last but not the least is that on signing up it provides you a free domain name which helps you in saving your money.
On the other hand, with all the above described features it makes a clear sense to go with the Bluehost as it has no risk factor and also comes up with a 30 day money back guarantee scheme. So, if in any case you don’t like their hosting services then you can cancel the same anytime.
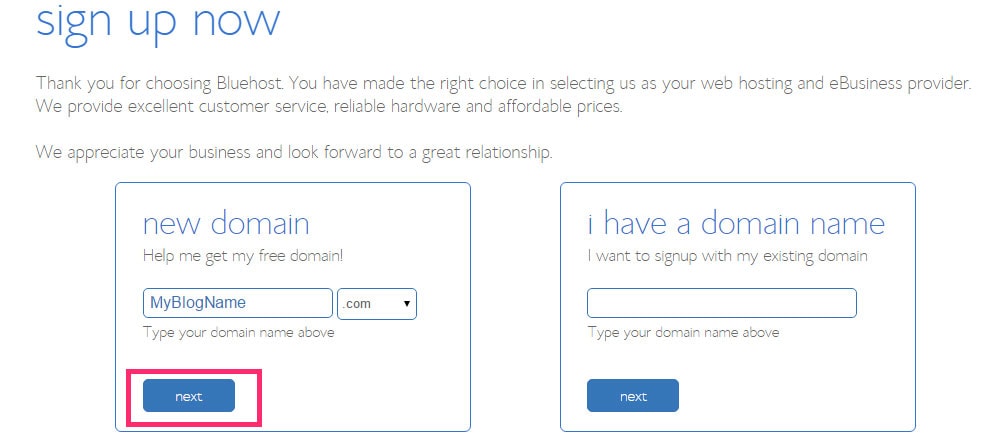
Now comes the part of setting up a hosting account. The very first thing is to go to the Bluehost and click on the sign up now button and this will take you to the other screen. In the mean time you can also choose a domain name of your choice as Bluehost will provide you the same for free and on the other hand, if you have already purchased your domain name, then also it will provide you the information for transferring the same.
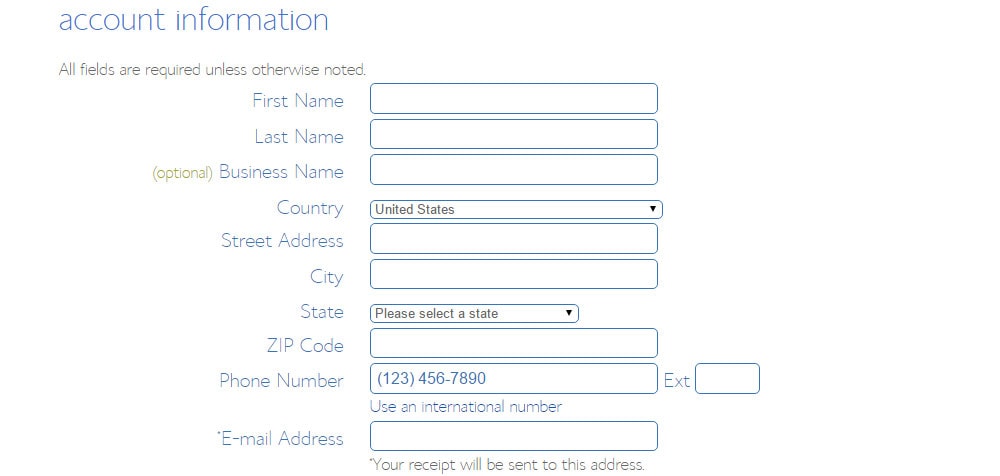
After all this, you will need to fill in your personal information on the next screen and select your desired web hosting package.
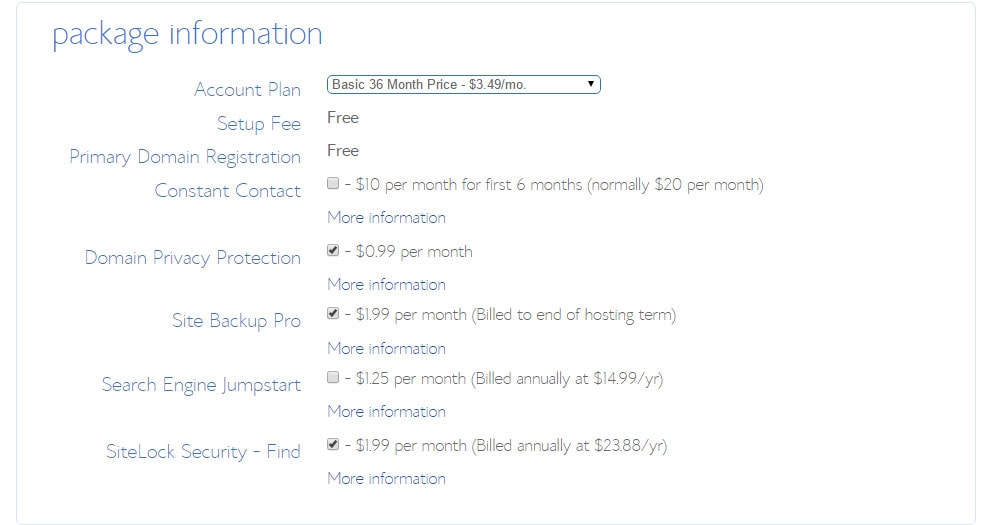
Bluehost offers you various types of packages depending upon your needs and which usually range from 12 months to 36 months and that too for a very nominal price and the most important thing is that you will get a huge discount for the longer you are willing to commit. Just keep in mind that you are required to pay all the annual charges in advance.
Now, after completion of your registration process, you will get a predefined confirmation mail that contains all the required information you will need to proceed.
>>>>CLICK HERE TO LAUNCH SELF HOSTED WORDPRESS BLOG WITH BLUEHOST AT 3.49$ Per MONTH SPECIAL PRICE
Content Outline
2. Install WordPress

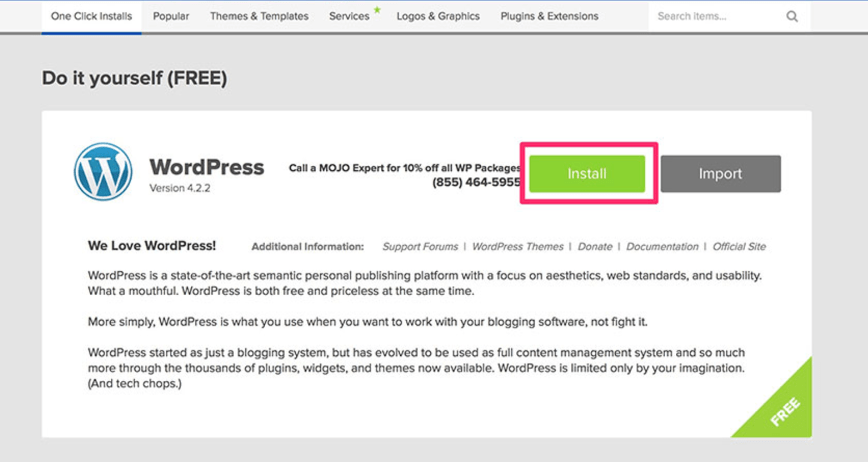
After all the tough parts this is the simplest step which includes installation on WordPress for further process. The Bluehost has made this step more simple so that anyone can easily do this. For this, all you have to do is just scroll down the page to its website section and click on the install WordPress button.
Now wait for the new page to load and for this, you have to be patient as it can take a minute.
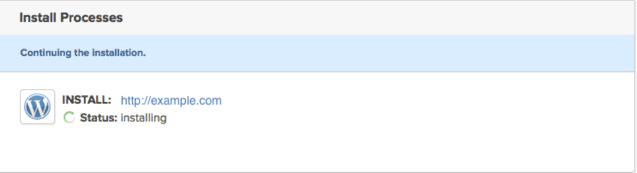
Now a new WordPress screen will appear on your screen, in which you have to simply click on install icon and that will automatically lead you to a new screen. On this screen, select your domain name on which you want to run your WordPress and after this just click on the check domain button.
After this is the last step in which you have to click on advanced options and type the name of your site or title. Further, just accept the admin username and admin password that Bluehost is suggesting. You can easily change this username and password anytime you want.
Now your WordPress installation is complete and congrats as you have just installed WordPress on your blog.
Check out our latest discount on WP Engine. Get Wp Engine Discount coupon codes and save 20% now
3. Start designing your blog with themes
This step basically talks about the designing of your new blog by selecting different themes from the WordPress. Basically, a theme allows you to control the specific look and feel of your blog and that too without coding expertise and any specific designing knowledge. On the other hand, a good theme helps you to design your blog exactly the way you want it with all specifications. For those who don’t know coding, the themes makes their work thousand times easier and faster.

WordPress consist of two types of themes out of which one is the framework and the other is a child theme.
Framework usually acts as a backbone of the blog. There are various premium WordPress theme frameworks easily available on the market. But one of the best is Genesis. It is very easy and flexible to use.
It is the first half of your theme as other themes only handle the aesthetics of your newly build website, but on the other hand it provides all the necessary information for your Genesis child theme as well.
Child theme is the beauty of your blog. Once you are done with the genesis framework, you will need to have a perfect child theme for your blog.
One of the best and the beautifully designed child theme is the tru theme which is easily available in the Genesis community. For more choices you can go to BYLT and browse their superbly designed collection of themes and select the one which suits your needs best.
4. Write and publish your first blog post
Now you are almost ready to start your first WordPress blog on Bluehost. For this just click on post button and after that click on add new option on the left side of the menu. Now you will see the new post screen on your system. Just start by entering the title of your blog and after this start writing your first post in the space which is just below the title.

You can choose any topic topic of your choice for your first post like you can write about why you are starting a blog or how often you will post new blogs. Once you are done with the writing part just click on the publish button and it will automatically publish your blog post for the world to see and read it.
So, congratulations as you have just published your first blog on your own self hosted WordPress.
Also, read
- pCloud Review: Dropbox Alternative? Read Before Buy
- (Updated) GoDaddy VPS Coupons Code
- Web Hosting Reviews – The Best & Worst
- Nexcess Review
- Nexcess coupon code
Over To You: HOW TO START A WORDPRESS BLOG
So this is all about how to start your self-hosted WordPress blog on Bluehost. All the above-mentioned steps are very easy to understand which will help you in starting your first blog without any hassle.
>>>>CLICK HERE TO LAUNCH SELF HOSTED WORDPRESS BLOG WITH BLUEHOST AT 3.49$ Per MONTH SPECIAL PRICE