There are two ways to integrate with Facebook, and we’ll go over both of them below:
- Pixel by Facebook (client-side Javascript tracking)
- CAPI on Facebook (server-side notifications)
Using their Javascript pixel code is the most popular and widely used method of integrating with Facebook for almost all platforms. This is the script that Facebook gives users to put on their website, and when those scripts are loaded, those events are passed back to Facebook.
While this is the most commonly used method, it is also the least reliable.
As more browsers and extensions release features to aid in user privacy, more efforts are being made to prevent those events and tracking events from being sent back to Facebook. So, if that script cannot be loaded on the user’s device for whatever reason, no data will be sent back to Facebook.
Server-side notifications are a more reliable method of sending data because they occur in the background and eliminate the need for scripts to be loaded on the user’s device as well as the impact of adblockers.
We’ll go over how to set up each option and how they work below. Before diving into the article you can check thrivecart coupon codes.
Content Outline
1. Standard Facebook Pixel – Thrivecart Facebook pixel tracking
You must navigate to Checkout > Tracking in your product settings.

Here you can enable the option for Facebook, and you’ll need to enter your Facebook Pixel ID into the field.
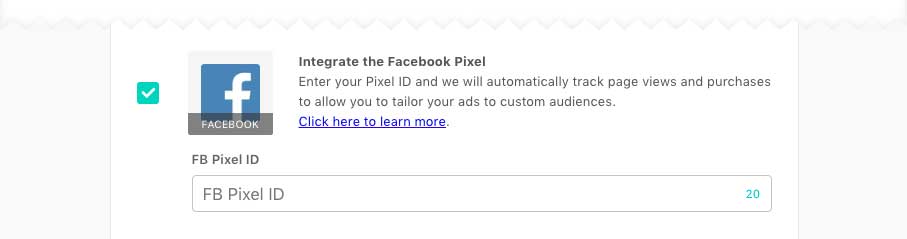
When you’re finished, you can save your product, and your Facebook pixel and purchase event tracking will be saved in your product and funnels.
You do not need to add any additional codes or upsells/downsells to your product.
If you are running Facebook ads and want to associate purchase events with these ads, you must use a custom subdomain within ThriveCart. Facebook will now only track events that occur on domains that you own and have verified in your dashboard. See this article on Facebook domain verification for more details.
ThriveCart will handle your Facebook codes automatically throughout the product funnel and report data back to Facebook:
ViewPage (default, loaded on each page in the funnel).
InitiateCheckout (this appears after the user enters their email address.) This event used to load instantly when someone arrived at the checkout page, but recent Facebook changes now require specific event parameters (including an email address).
BrowseContent (loaded on the upsell & down-sell pages).
Invest in (loaded on the success page or before redirecting to your custom success page and for each product the customer purchased in the funnel).
We include a variety of data and parameters for each event, such as the value, currency, product type, ID, name, and more.
Example content-type: product and the product ID, such as product-xx, bump-xx, upsell-xx, and down-sell-xx, where ‘xx’ is the product ID from your account.
By default, we send one purchase event for each item purchased in the funnel. For example, if you buy the Product, a Bump, and an Upsell, you’ll have three Purchase events with information for each one. To send a single purchase event for the entire order, check the ‘combine charges’ box.
The amount reported back to Facebook is the amount paid by the customer, not the amount they may pay in the future. This price does not include taxes or shipping.
Using a custom success page?
When running a custom success page, the ThriveCart hosted success page is temporarily loaded in the background before redirecting to your custom page (the customer is not aware of this).
We have a short delay to allow time for 3rd-party scripts (like this) to fire and report back, but depending on the user’s device, internet speed, and the time it takes for your site to load, it’s possible that the browser Pixed based purchase event doesn’t have time to load before the customer is taken to your site (assuming the event isn’t blocked by the notes at the top of this article).
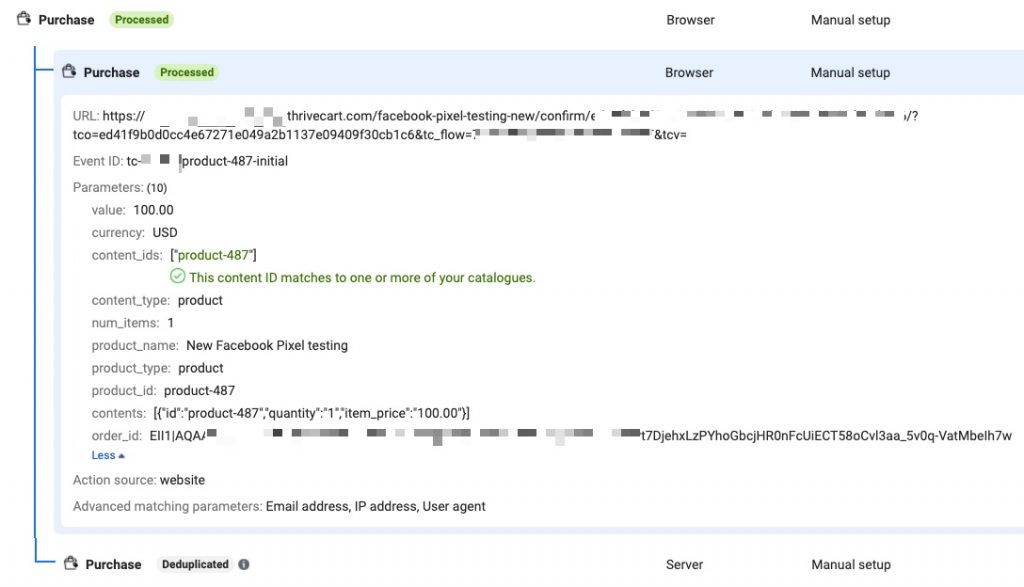
How are Event IDs generated?
Do you want to know how Event IDs are generated for deduplication?
The Event IDs we generate are generated by tc.
-[product id]-[one-of-a-kind viewer id]-[unix timestamp]
This means that the same device will not generate the same event ID twice (they have to be unique)
Purchase events have their own ID as well. They are as follows: tc-[order id]-initial (for the initial purchase event, if it is combined into a single event), tc-[order id]-[product/upsell/downsell]. -[item id]-initial if there are multiple events (for example, tc-2135-product-5 and then tc-2135-upsell-3, etc.).
Rebills are as follows: tc-[order id]-[product/upsell/downsell]
-rebill x-[item id] (where X is the number of rebills that have been tracked so far).